Network Requirements
- PC1 is connected to IP Network via Device, and Device adopts 802.1X access control.
- The authentication mode adopts the RADIUS authentication.
- PC1 cannot access the network if not being authenticated successfully. After passing the authentication, PC1 is permitted to access IP Network.
- The authenticated user can generate the arp-check entry to perform the validity detection for the arp packet of the authenticated user.
Network Topology
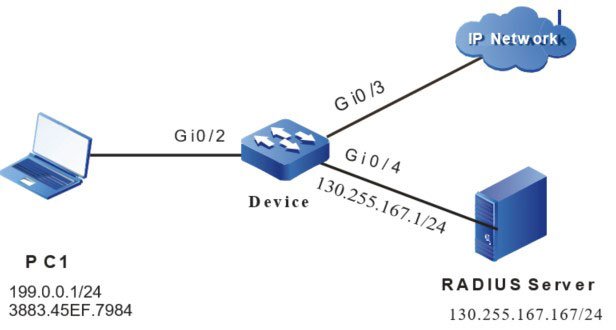
Figure 1-3 Networking of combining ARP Check with 802.1X
Configuration Steps
Step 1: On Device, configure the link type of the VLAN and port.
#On Device, create VLAN2~VLAN4.
|
Device#configure terminal
Device(config)#vlan 2-4
Device(config)#exit
|
#Configure the link type of port gigabitethernet 0/2 as access, permitting the services of VLAN2 to pass.
|
Device(config)#interface gigabitethernet 0/2
Device(config-if-gigabitethernet0/2)#switchport access vlan 2
Device(config-if-gigabitethernet0/2)#exit
|
#On gigabitethernet 0/3-gigabitethernet 0/4 of Device, configure the port link type as Access, permitting the services of VLAN3-VLAN4 to pass respectively (omitted).
Step 2: Configure the interface IP address of Device.
#Configure the IP address of VLAN4 as 130.255.167.1/24.
|
Device(config)#interface vlan 4
Device(config-if-vlan4)#ip address 130.255.167.1 255.255.255.0
Device(config-if-vlan4)#exit
|
Step 3 : Configure the AAA authentication.
#On Device, enable the AAA authentication, adopt the RADIUS authentication mode, the server key is admin, the priority is 1, and the RADIUS server address is 130.255.167.167/24.
|
Device(config)#aaa new-model
Device(config)#aaa authentication connection default radius
Device(config)#radius-server host 130.255.167.167 priority 1 key admin
|
Step 4 : Configure the AAA server.
#On the AAA server, configure the user name, password, and key value as admin (omitted).
Step 5: Configure the 802.1X authentication.
#Enable the 802.1X authentication on the port, and configure the authentication mode as Macbased.
|
Device(config)#interface gigabitethernet 0/2
Device(config-if-gigabitethernet0/2)#dot1x port-control enable
Device(config-if-gigabitethernet0/2)#authentication port-method macbased
Device(config-if-gigabitethernet0/2)#exit
|
Step 6: On Device, configure the ARP Check function.
#Enable the ARP Check function on port gigabitethernet0/2.
|
Device(config)#interface gigabitethernet 0/2
Device(config-if-gigabitethernet0/2)#arp-check enable
Device(config-if-gigabitethernet0/2)#exit
|
Step 7: Authenticate successfully.
#Before passing authentication, PC1 cannot access the network.
#After initiating the authentication and being authenticated successfully, PC1 can access IP Network.
Device#show dot1x user

NO 1 : MAC_ADDRESS= 3883.45ef.7984 STATUS=     Authorized    USER_NAME= admin
         VLAN=    2       INTERFACE= gi0/2             USER_TYPE= DOT1X
         AUTH_STATE= AUTHENTICATED BACK_STATE= IDLE           IP_ADDRESS= 199.0.0.1
         IPV6_ADDRESS= Unknown

         Online time: 0 week 0 day 0 hours 0 minute 51 seconds

 Total: 1 Authorized: 1 Unauthorized/guest/critical: 0/0/0 Unknown: 0
Step 8 : Check the result.
Device#show arp-check interface gigabitethernet0/2
 	ARP Check Table
 FLAG Codes:

Interface-Name Status MAC-Address     IP-Address Rate PolicySource SetHardware
gi0/2          enable 3883.45ef.7984  199.0.0.1  15   DOT1X        active

total number: 1
#If the arp packet sent by PC1 matches with the entry completely, forward it and limit the speed normally. If not matching, drop it directly.
 Switch