DAI Combining With DHCP Snooping
Network Requirements
- PC1 and PC2 are connected to IP Network via Device; PC2 is the DHCP client; Device2 is the DHCP relay.
- Device1 configures DHCP Snooping and port DAI function, realizing that PC2 can access IP Network normally and PC1 cannot access IP Network.
Network Topology
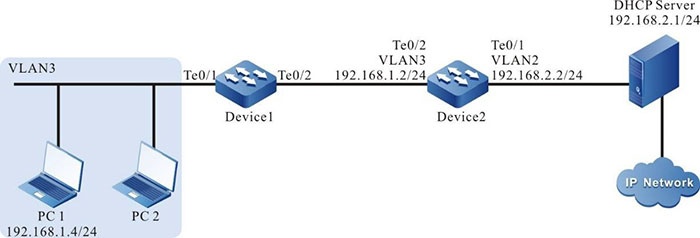
Figure 9–1 Networking of combing DAI with DHCP Snooping
Configuration Steps
Step 1: Configure the link type of VLAN and port on Device1.
#Create VLAN3.
|
Device1#configure terminal
Device1(config)#vlan 3
Device1(config-vlan3)#exit
|
#Configure the link type of port tengigabitethernet0/1 and tengigabitethernet0/2 as Access, permitting the services of VLAN3 to pass.
|
Device1(config)#interface tengigabitethernet 0/1-0/2
Device1(config-if-range)#switchport access vlan 3
Device1(config-if-range)#exit
|
Step 2: Configure the link type of VLAN and port on Device2.
#Create VLAN2 and VLAN3.
|
Device2#configure terminal
Device2(config)#vlan 2-3
|
#Configure the link type of port tengigabitethernet0/1 and tengigabitethernet0/2 as Access; port tengigabitethernet0/1 permits the services of VLAN2 to pass; port tengigabitethernet0/2 permits the services of VLAN3 to pass.
|
Device2(config)#interface tengigabitethernet 0/1
Device2(config-if-tengigabitethernet0/1)#switchport mode access
Device2(config-if-tengigabitethernet0/1)#switchport access vlan 2
Device2(config-if-tengigabitethernet0/1)#exit
Device2(config)#interface tengigabitethernet 0/2
Device2(config-if-tengigabitethernet0/2)#switchport mode access
Device2(config-if-tengigabitethernet0/2)#switchport access vlan 3
Device2(config-if-tengigabitethernet0/2)#exit
|
Step 3: Configure VLAN interface and IP address on Device1 and Device2. (Omitted)
Step 4: Configure the DHCP Snooping function on Device1.
#Enable the DHCP Snooping function and configure the port tengigabitethernet0/2 as trust port.
|
Device1(config)#dhcp-snooping
Device1(config)#interface tengigabitethernet 0/2
Device1(config-if-tengigabitethernet0/2)#dhcp-snooping trust
Device1(config-if-tengigabitethernet0/2)#exit
|
Step 5: Configure the port DAI function on Device1.
#Enable the port DAI function on port tengigabitethernet0/1.
|
Device1(config)#interface tengigabitethernet 0/1
Device1(config-if-tengigabitethernet0/1)#ip arp inspection
Device1(config-if-tengigabitethernet0/1)#exit
|
Step 6: Configure the IP address of the DHCP relay server on Device2.
#Configure the IP address of the DHCP relay server as 198.168.2.1.
|
Device2(config-if-vlan3)ip dhcp relay
Device2(config-if-vlan3)ip dhcp relay server-address 192.168.2.1
|
Step 7: Check the result.
#After PC2 gets the address successfully; view the DHCP Snooping dynamic entries on Device1.
Device1#show dhcp-snooping database
        dhcp-snooping database:
        database entries count:1
        database entries delete time :300
        -----------------------------------------
        macAddr         ipAddr         transtion-id  vlan  interface leaseTime(s) status
        0013.0100.0001	192.168.1.100  2             2     te0/1     107990       active
        ------
#PC2 can access IP Network normally and PC1 cannot access IP Network.
 Switch