Configure TACACS Authorization and Statistics of Shell Command
Network Requirements
- Device is connected to the Telnet and RADIUS server and the IP route is available.
- The IP address of the RADIUS server is 2.0.0.2/24, the service port is 49, and the share key is admin.
- After Telnet client logs in to Device, the operated shell command with user level 15 is required to be authorized via TACACS server and record the shell command to the TACACS server.
Network Topology
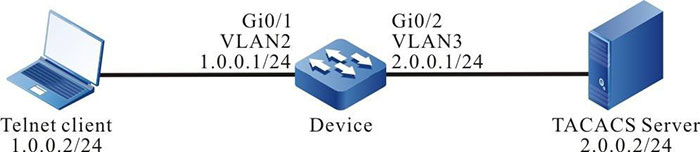
Figure 11–3 Networking of configuring the TACACS authorization and accounting of the Shell command
Configuration Steps
Step 1: Configure VLAN, and add the port to the corresponding VLAN. (omitted)
Step 2: Configure the IP address of the interface.(Omitted)
Step 3: Configure Device.
#Configure the TACACS command authorization and accounting.

-
The authentication should succeed before authorization and accounting.
|
Device#configure terminal
Device(config)#domain system
Device(config-isp-system)#aaa authentication login tacacs-group tacacs-group local
Device(config-isp-system)#aaa authorization commands 15 tacacs-group tacacs-group
Device(config-isp-system)#aaa accounting commands 15 tacacs-group tacacs-group
Device(config-isp-system)#exit
Device(config)#aaa authorization config-commands
|
#Configure the TACACS server, the service port is 49, and the share key is admin.
|
Device(config)#aaa server group tacacs tacacs-group
Device(config-sg-tacacs-tacacs-group)#server 2.0.0.2 port 49 key admin
Device(config-sg-tacacs-tacacs-group)#exit
|
#Configure the Telnet session and enable the TACACS authorization and accounting.
|
Device(config)#line vty 0 15
Device(config-line)#login aaa
Device(config-line)#exit
|
Step 4: Configure the TACACS server.
For the interface setting of the TACACS server, refer to the help document of the server.
The following lists the main steps.
#Add the client 2.0.0.1 on the server, the share key is admin, and select “TACACS+(Cisco IOS)” authentication.
#Set the Shell command authorization for Telnet user admin. Permit the commands configure terminal, router ospf and router rip, and refuse the other commands.
Step 5: Check the result.
#After Telnet user logs in to Device, execute the Shell command. The authorized command can be executed successfully and the un-authorized command authorization failed.
|
Device#configure terminal
% Enter configuration commands, one per line. End with CNTL+Z.
Device(config)#router ospf 100
Device(config-ospf)#exit
Device(config)#router rip
Device(config-rip)#exit
Device(config)#interface fastethernet 0/1
Command authorization failed
Device(config)#router bgp 100
Command authorization failed
|
#View the Shell command statistics information.
On the TACACS server, we can see the statistics information of the Shell command.
 Switch