Configure Basic Functions of ARP Check
Network Requirements
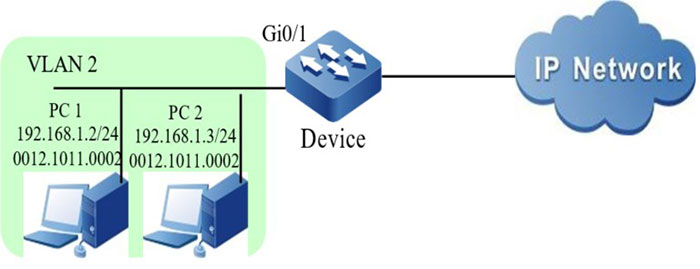
- PC1 and PC2 are connected to IP Network via Device.
- Configure the ARP Check basic function, realizing that PC1 can access IP Network normally and PC2 cannot access IP Network.
Network Topology

Figure 1–1 Networking of configuring the ARP Check basic functions
Configuration Steps
Step 1: Configure the link type of the VLAN and port on Device.
#Create VLAN2.
|
Device#configure terminal
Device(config)#vlan 2
Device(config-vlan2)#exit
|
# Configure the link type of the port gigabitethernet0/1 as Access and permit the services of VLAN2 to pass.
|
Device(config)#interface gigabitethernet 0/1
Device(config-if-gigabitethernet0/1)#switchport mode access
Device(config-if-gigabitethernet0/1)#switchport access vlan 2
Device(config-if-gigabitethernet0/1)#exit
|
Step 2: Configure the ARP Check function on Device.
#Enable the ARP Check function on the port gigabitethernet0/1 and configure the ARP Check binding entry with MAC address 0012.0100.0002 and IP address 192.168.1.2.
|
Device(config)#interface gigabitethernet 0/1
Device(config-if-gigabitethernet0/1)#arp-check enable
Device(config-if-gigabitethernet0/1)#arp-check binding 0012.0100.0002 192.168.1.2 rate 10
Device(config-if-gigabitethernet0/1)#exit
|
Step 3: Check the result.
#View the ARP Check configuration information.
Device#show arp-check brief
Interface Name       Status       Binding Table
gi0/1                Enable       Yes
……
You can see that the port gigabitethernet0/1 is enabled with the ARP Check function, and there is the ARP Check entry.
#View the port ARP Check binding entry.
Device#show arp-check interface gigabitethernet0/1
--------------------ARP Check Table---------------------
 FLAG Codes:

-------------------------------------------------------------
Interface-Name  Status  MAC-Address        IP-Address Rate  PolicySource   SetHardware
gi0/1           enable  0012.0100.0002     192.168.1.2  10   STATIC        active
total number: 1
#PC1 can access IP Network normally, but PC2 cannot access IP Network.
 Switch
 Wifi - Access Point
 Firewall
 Router
 Module Quang
![Module Quang Cisco]() Module Quang Cisco
Module Quang Cisco![Module quang HPE]() Module quang HPE
Module quang HPE![Module quang Maipu]() Module quang Maipu
Module quang Maipu![Module quang Brocade]() Module quang Brocade
Module quang Brocade![Module quang Fortinet]() Module quang Fortinet
Module quang Fortinet![Module quang Aruba]() Module quang Aruba
Module quang Aruba![Module quang OEM]() Module quang OEM
Module quang OEM![Module quang Juniper]() Module quang Juniper
Module quang Juniper![Module quang Dell]() Module quang Dell
Module quang Dell![Module quang Palo Alto]() Module quang Palo Alto
Module quang Palo Alto![Module quang Huawei]() Module quang Huawei
Module quang Huawei![Module quang Arista]() Module quang Arista
Module quang Arista![Module quang F5]() Module quang F5
Module quang F5![Module quang H3C]() Module quang H3C
Module quang H3C![Module Quang Allied Telesis]() Module Quang Allied Telesis
Module Quang Allied Telesis![Module quang SonicWall]() Module quang SonicWall
Module quang SonicWall![Module quang Mikrotik]() Module quang Mikrotik
Module quang Mikrotik![Module quang Handar]() Module quang Handar
Module quang Handar Máy chủ (Server)
 Thiết bị lưu trữ (SAN, NAS)
 Load Balancing
 Video Conferencing
 Phụ kiện máy chủ
 Thiết Bị IoT
 Phụ Kiện Mạng


.png)


